
Area yield jumped from 415.5 g/m² at 8 plants/m² to 1,091.2 g/m² at 18 plants/m² in a peer-reviewed controlled-environment study published in Horticulturae. That is the promise and the trap of the Sea of Green method in one result. You are not trying to make each plant impressive. You are trying to turn a fixed patch of lit floor into saleable grams per square meter per cycle, without losing the crop to damp lower growth, blocked emitters, or hours of fiddly labor.
I would judge every density choice that way. Count the plants, yes, but then ask what you spent on clones, substrate, dehumidification, cooling, transplanting, and inspection time to get that harvest. A canopy that wins on paper and finishes moldy has not won anything.
What the Sea of Green Method Is
The Sea of Green method uses many small plants instead of a few large ones. You keep them close enough for the tops to merge into a continuous canopy, prune lateral growth so one main cola dominates, and flip early. The Weedmaps guide to the Sea of Green method cites a common arrangement of approximately one to two plants per square foot, with containers around 7 to 12 inches across.
Each plant gives you less because it gets little vegetative time and most side growth is removed. That is not a flaw. The plant count does the work, provided every top sits at roughly the same height and no vigorous plant shades its neighbors into useless fluff.
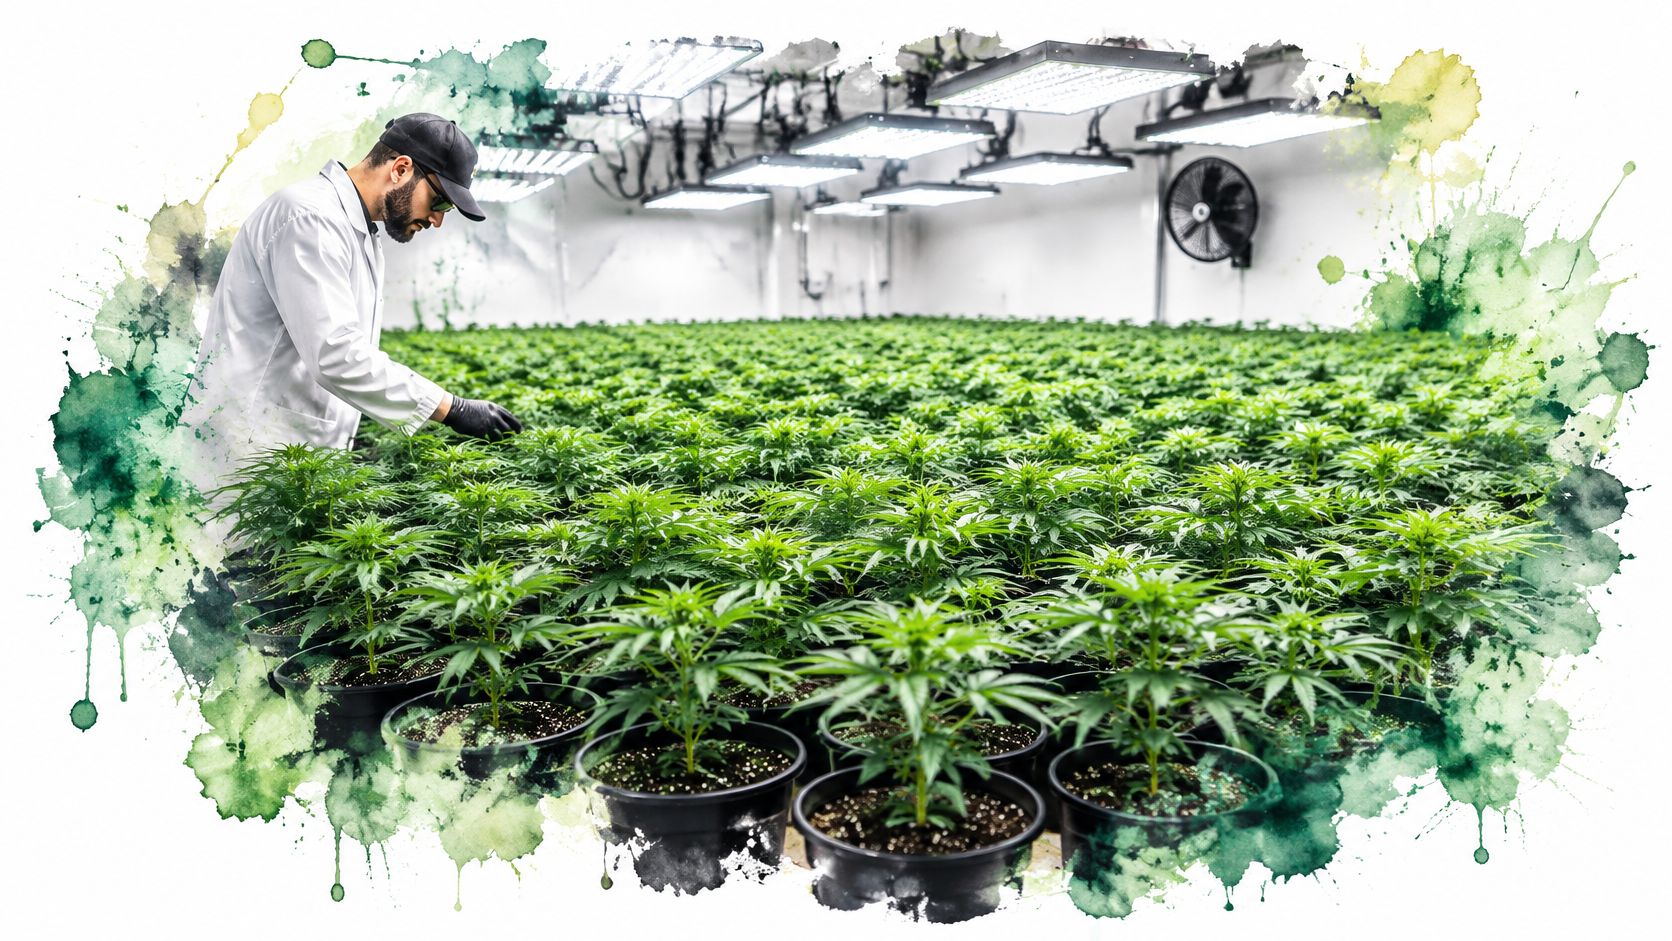
This research setup shows the uniform spacing you are aiming for.
Why uniformity matters more than plant size
Clones of the same age and vigor are the practical choice. Seed plants can work, but mixed heights and branching habits make a level canopy harder to maintain. You will spend the short veg period correcting differences instead of filling the footprint.
Growers often connect SOG to late 20th century Dutch indoor growers working in tight rooms under artificial light. Treat that as background, because the historical record is thin and partly anecdotal. The functional origin is clearer. Indoor growers needed a fast, compact crop that used limited height and expensive light well.
A good SOG canopy looks boring from above. Flat, even, and with no hero plant towering over the rest.
Because you start and flip the plants together, harvest is also synchronized. That simplifies drying space, labor planning, and room turnover. The downside is concentration of risk. One irrigation fault, humidity spike, or pest outbreak can affect many similar plants at the same vulnerable stage.
Don't confuse SOG with crowding pots together. Without short veg, early flowering, and active canopy control, crowding only gives you competition, stretch, and damp shade.
Sea of Green Density and Timing at a Glance
A useful starting bracket is 9 to 25 plants/m² with 7 to 21 days of veg. The best density is the one that produces saleable yield efficiently without making humidity control, harvest labor, or energy use per harvest harder to manage.
| Setup | Plants per m² | Vegetative period | Yield reference |
|---|---|---|---|
| Low-density trial | 8 | 10 days | 415.5 g/m² |
| Dense trial with short veg | 18 | 10 days | 1,091.2 g/m² |
| Lower-density trial with long veg | 10 | 28 days | 1,009 g/m² |
| German controlled-environment trial | 12 to 36 | Not reported in the trial summary | 119 to 247 g/m² flower yield |
| Typical SOG canopy | 9 to 25 | 7 to 21 days | Judge by saleable g/m² per completed cycle |
| Low-density comparison | 1 to 2 | Not stated for the comparison | 28% to 44% more area yield at 2/m²; 28% to 36% less per plant |
The 10 plants/m², 28-day veg treatment produced 1,009 g/m², close to the 1,091.2 g/m² recorded at 18 plants/m² with 10 days of veg. More plants can shorten the cycle; fewer plants need more time to fill the area. Compare saleable yield per square meter per completed cycle, not just the harvest weight from one run.
What other density results add
A German controlled-environment trial reported flower yields of 119 to 247 g/m² across densities of 12 to 36 plants/m². Its yields are far below those in the other trial results here, so don't transfer a figure directly to a different room. Cultivar, light, nutrition, root volume, and harvest criteria all affect the comparison.
A Cannaseuse summary of a 2022 study reports that increasing density from one to two plants/m² reduced yield per plant by 28% to 36% and raised yield per area by 28% to 44%. This comparison sits below the usual SOG range, but it shows the trade-off: gains per area can come with lower output per plant.
Use 9 to 25 plants/m² and 7 to 21 days of veg as a planning bracket, not a target. Judge each density against the saleable yield it delivers per square meter per completed cycle. More plants may mean more pots to water, inspect, and harvest; a denser canopy also needs humidity control that keeps foliage from staying damp. A longer veg period gives fewer plants more time to fill the area, but extends the cycle and its energy use.
Choose the highest density your room can manage without compromising those trade-offs. If airflow or access is limited, a lower density may deliver more saleable flower per cycle with less labor and less humidity pressure.
Lighting and Nutrient Settings for a Dense Canopy
Set the light before the first clone goes in. A dense canopy exposes weak coverage immediately. The center races ahead, the edges lag, and your supposedly level sea becomes a bowl.
Hang the fixture so the footprint is as even as you can make it across the whole tray. Use a PAR meter if you have one, or a phone-based sensor you have checked for consistency, and measure at canopy height in the center, corners, and edges. You're looking for relative uniformity, not a number copied from another grower's fixture.
Manage height as the canopy rises
Raise the fixture as the tops rise, following the manufacturer's distance guidance for your exact light. Don't let the tallest few plants dictate the setting while the rest stretch. Correct height differences with training and plant placement first.
Keep one schedule for the whole canopy. SOG depends on plants transitioning together. A corner left under a different timer or shaded by equipment will not catch up during a short veg.
Measurement rule: If you cannot describe how light changes from center to edge, you are guessing at density.
Feed the root zone you actually have
Many small containers dry and accumulate salts differently from a few large pots. Start at a lower feed strength than you'd use for a large, long-veg plant, then increase only when growth and runoff readings support it. Use an EC meter and check runoff from several positions, not just the easiest pot at the front.
A simple balanced fertilizer program can work as a starting framework, and this 10-15-10 fertilizer guide is useful for understanding what those label ratios mean. The label is not a cannabis-specific prescription. Let plant response, substrate, and runoff guide adjustments.
Watch the lower leaves. In a dense SOG, burn, yellowing, or salt stress can show there while the top still looks acceptable from standing height. By the time the upper canopy complains, you've usually fed the problem for several days.
Keep a cycle log with four fields:
- Feed strength: Input EC and product used.
- Runoff response: EC from front, middle, and back pots.
- Light position: Fixture height above the average top.
- Canopy note: Height spread and any shaded zone.
There is no universal intensity or nutrient concentration in the material behind this guide that applies across cultivars and fixtures. I would rather see you measure one room properly than copy precise settings from a room with different genetics, vapor pressure, and irrigation.
How to Build a Sea of Green Canopy Step by Step
This sequence compresses the visual version of the build into the checks that matter.
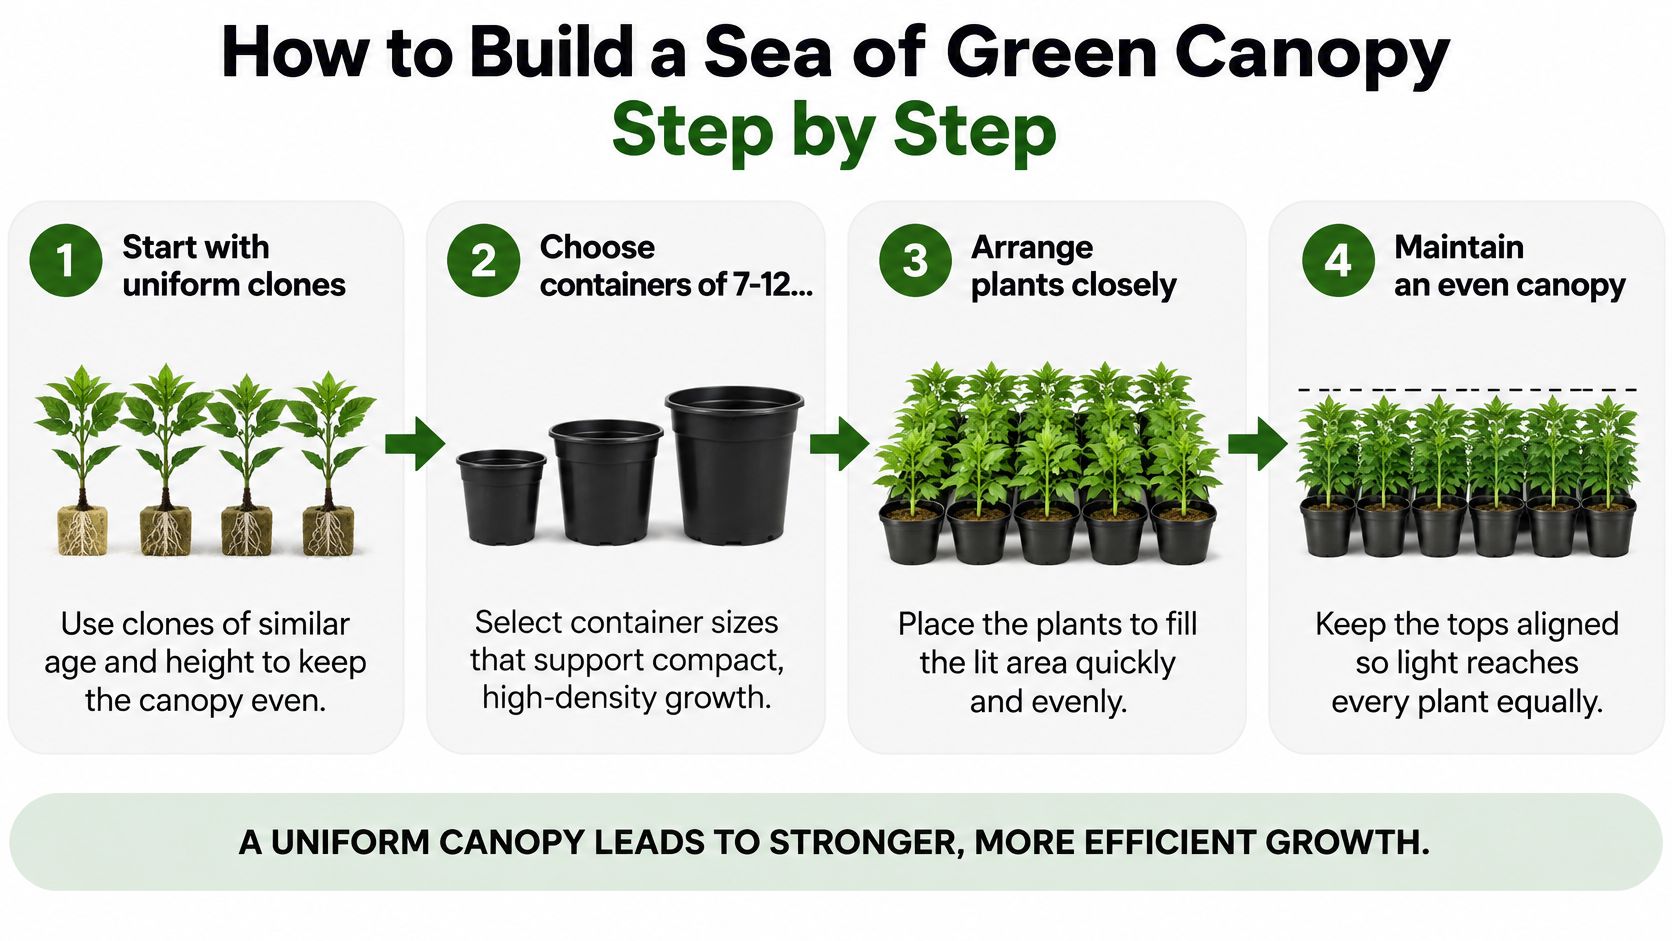
Start with uniform clones. Use cuttings of similar age, root development, and height, ideally from the same mother. Sort them before transplant and leave obvious runts out. Mixing cuttings from different mothers is the fastest way to build mixed vigor into the room.
Use matched containers. Choose pots roughly 7-12 inches across, about 18-30 cm, and fill them to the same level with the same substrate compaction. Uneven fill gives you uneven dry-back, and then your irrigation schedule is wrong for part of the canopy.
Set count from the footprint. The common one to two plants per square foot converts to roughly 11-22 plants/m². Don't start at the maximum until your fans and dehumidifier have proved they can handle a full canopy. Plant count is easy to increase next cycle. Botrytis is harder to undo.
Veg briefly on 18/6. The PlantClue Sea of Green guide describes contemporary SOG conventions of approximately 9-25 plants/m² and a vegetative period of roughly 7-21 days. Check the top daily with a straight edge or a level sightline across the tray. Skipping that check leaves a shaded lower tier you'll later prune away.
After those setup checks, this short video is worth watching for the physical arrangement before you start training.
Train while stems bend. Begin mid-veg, while growth is flexible, and pull any leader that climbs above its neighbors back into the plane. Waiting until stems stiffen turns a small correction into snapped tissue and an open wound.
Flip the whole canopy to 12/12 on one day. Flowering commonly runs about 8-10 weeks, depending on cultivar and maturity criteria. Cloudy or white trichomes are a practical harvest check, but don't let one early plant force the whole room. Flipping plants at different heights preserves the unevenness you were trying to remove.
Keep every pot reachable. Leave a walkway or use trays you can slide without tearing foliage. Check each container, emitter, and plant base daily. The most expensive SOG failures are often boring ones, such as a back-row pot that stayed dry for three days because nobody could reach it.
Feed lightly and consistently. Start low, raise strength as the canopy establishes, and verify with runoff. Overfeeding a dense canopy tends to punish the lower tier first, right where airflow is weakest.
The synchronized cycle is the payoff. One transplant window, one flip, one flowering window, and one planned harvest and reset. If your plants need individual schedules, you don't have a SOG yet. You have many small plants sharing a room.
Low-Stress Training Versus Topping for an Even Canopy
The main trade is speed against structure. Low-stress training keeps a short SOG cycle moving. Topping creates more leaders per plant, but it spends recovery time you may not have.
| Technique | When to apply | Stress on plant | Canopy effect | Main risk |
|---|---|---|---|---|
| Low-stress training | Weeks 2-4 of veg, once stems are flexible | Low | Spreads tops into an even layer | Slow to flatten if started late |
| Topping | After the 4th or 5th node in veg | Moderate | Doubles main colas and widens the canopy | Stunting and delay if done close to the flip |
| Top then train | Top once, then train for 1-2 weeks | Moderate to high | Flattest and most uniform canopy | Needs recovery time before the flip |
| Untrained single cola | No training applied | Low | Tall, uneven canopy | Lower tiers shaded and weak |
When bending is enough
With low-stress training, you bend and tie the leader outward so side growth reaches the same plane. Use soft plant ties, fabric strips, or purpose-made clips. Don't use thin wire directly against a stem. It cuts in as the stem thickens.
Work after watering, when stems are more pliable, and make small corrections over several days. In a true high-density SOG, you often need less dramatic training than in a low-count grow. Each plant has a small territory. Your job is to stop it escaping upward, not to spread it across half a tent.
LST suits a short veg because recovery is brief. It also lets you correct one vigorous clone without resetting the whole room's timing.
When topping earns its delay
Topping cuts the growing tip after about the fourth or fifth node and encourages two leaders. That helps when your plant count is at the lower end and each plant must cover more area. It is a poor fit when you plan to flip in a few days.
Top once, then train the two leaders for one to two weeks if you need the flattest possible top. This combined approach gives excellent control, but it isn't free. More handling means more labor per plant, and that labor multiplies fast in SOG.
If topping forces you to extend veg, compare the extra electricity and labor against simply adding uniform plants next cycle.
I would use this decision rule. Choose LST when plant count is high and time is short. Choose topping when count is limited and you need more colas from each pot. Combine them only when canopy levelness is the limiting factor and the cultivar recovers predictably.
The untrained plant remains a useful baseline. A single dominant cola can fit SOG if the genetics stay compact and uniform. If internodes stretch and lower growth sits in permanent shade, no amount of wishful spacing will make that an efficient canopy.
Humidity and Airflow Targets for Dense Canopies
Dense canopies fail at the base first. The top can look bright and dry while leaves below sit in still, wet air.
| Stage | Relative humidity target | Airflow and spacing note | Risk if exceeded |
|---|---|---|---|
| Vegetative | 55-65% | Tops touch but do not stack | Fungal problems above 85% |
| Flowering | 45-55% | Strong horizontal fan movement through the canopy | Bud rot and mold in dense tops |
| Late flower | Below the flowering target, with further reduction | Clear dead leaves from the lower canopy | Botrytis |
The Kind Seed Sea of Green guide recommends approximately 55-65% relative humidity during vegetative growth and 45-55% during flowering, with further reduction late in flower to limit botrytis risk. It also notes that humidity above 85% has been associated with fungal problems. Treat 85% as a failure zone, not as a ceiling you can flirt with overnight.
Measure where moisture collects
Put one sensor at canopy height and another in the lower canopy. A wall-mounted room sensor won't tell you what's happening between pots. Log both readings at lights-on, mid-cycle, and just before lights-off for the first run. You'll learn quickly whether your dehumidifier is sized for a full canopy or only for an empty room.
Run active exhaust and intake, then add horizontal fans that move air through the canopy, not only across the top. Leaves should move gently at several depths. A violent top layer and a motionless base means the fan placement is wrong.
Space the tops so they form a continuous layer without heavy overlap. Remove only weak or persistently shaded lower growth. Heavy defoliation can open the canopy for a day, then stress the plants and expose you to a rebound of small, dense regrowth.
Use this diagnostic:
- Lower canopy still damp one hour after lights-on: Airflow is inadequate or density is too high.
- Only one zone stays damp: Check fan angle, a blocked intake, or a cluster of oversized plants.
- Whole room rises after irrigation: Reduce watering volume per event or increase dehumidification capacity.
Mixed vigor, late flipping, weak airflow, excessive defoliation, and inaccessible pots feed the same problem. They create pockets you cannot see or dry. I would fix those before buying a stronger light. Extra photons won't rescue flower that has to be cut out.
Common Problems and How to Judge Real Yield
Lower-canopy yellowing is an early warning, not a diagnosis. Check light exposure, moisture, and emitter output at pot level before changing the feed.
| Symptom | Likely cause | Fix |
|---|---|---|
| Lower canopy yellowing | Shading from uneven tops | Prune weak lower growth and retrain the canopy |
| Grey or white patches | High humidity and poor airflow | Lower relative humidity, improve air movement, and remove affected tissue |
| Uneven plant height | Mixed vigor or late flipping | Sort plants by vigor and flip the whole canopy together |
| Uneven dry-back | Blocked or failed emitter | Check each container and emitter daily |
| Stretching after the flip | Light too far from the canopy or uneven training | Adjust light position and retrain tops to a level canopy |
Leaf curl can result from watering, feed, or environmental problems. Use this guide to diagnose cannabis leaf curl before changing several variables at once. Adjust one factor, then record the response. In a dense canopy, many similar leaves can make a small change look more significant than it is.
Use area yield, then subtract the costs
At low densities, adding plants can raise yield per area while reducing yield per plant. That relationship is directional, not a guarantee that a denser SOG canopy will produce more saleable flower. Judge the harvest by what remains after drying, trimming, and removing damaged or unsaleable material.
Treat neat 1 g/W claims and percentage gains over untrained plants with caution. Genetics, light quality, canopy uniformity, environmental control, and CO₂ can all affect results. Those figures also may not account for discarded flower or added trimming labor.
Track these fields each cycle:
- Saleable grams per square meter: Weigh flower after drying and trimming, excluding unsaleable material.
- Mold-free completion: Record the share of the crop that finishes without mold.
- Irrigation uniformity: Note pots with missed or uneven dry-back.
- Labor per harvest: Track transplanting, training, pruning, inspection, and trimming time.
- Repeatability: Check whether the same settings produce a similar result next cycle.
Compare saleable yield per square meter with humidity control, labor, and energy demands. A denser canopy only helps if the extra harvest is worth the added work and environmental load. Small handling tasks add up across every pot and week, so record the time rather than judging it by how manageable one task feels.
Choose Your Density and Run a First Cycle
Set density by constraints you control: light coverage, fan and dehumidifier capacity, and the number of plants you can inspect properly each day. The controlled-environment research in Horticulturae supports the conclusion that the best density depends on lighting, cultivar structure, rooting volume, irrigation uniformity, and your ability to manage humidity in a crowded canopy. It used high-intensity LED conditions, so don't assume the same setting works in a low-light home setup.
Compare options by yield per kilowatt-hour and labor per harvest, not only by grams per square meter. Cooling and dehumidification are part of the method's real cost, especially when a denser canopy transpires into a small room.
I would run the first cycle like this:
- Start at the low end of the typical SOG range.
- Log saleable yield, mold-free completion, and irrigation uniformity.
- Increase density only if the lower canopy held its humidity target and never stayed damp past one hour after lights-on.
- Hold density if labor rose faster than saleable yield. Fix airflow and access first.
That's a real go or no-go test. Density earns an increase only when the room stayed controllable.
The Magic Mushroom Delivery offers adults 21+ a curated range of mushroom products, including raw mushrooms, chocolates, gummies, capsules, and mushroom coffee, alongside practical educational guides for growers and curious readers. If careful canopy work has you thinking about the wider world of fungi and plant care, visit The Magic Mushroom Delivery to browse the range and arrange fast, discreet delivery.