
A mushroom casing layer is a hydrated, low-nutrient layer over colonized substrate that helps shift the fungus from vegetative growth toward fruiting; conventional button-mushroom casing targets a pH of 7.2–8.2. Use the specification table below to judge a mix by its water storage, open pores, and chemistry, not just by how wet it feels.
The familiar advice to add a moisture blanket and keep misting misses the most important trade-off. A casing must supply water without closing the air spaces that developing mushrooms need, and its living microbial community can matter as much as its ingredients.
What a Mushroom Casing Layer Is For
A mushroom casing layer is a working interface between colonized compost and the air above it. For button mushrooms, Agaricus bisporus, think of it as a damp, breathable skin rather than a second meal.
The compost feeds the crop. The casing creates a place where water, air, fungal threads, and casing-associated microbes interact as fruiting begins. Adding rich material because it looks more fertile can undermine that separation.
Target specs for a conventional casing layer
The published button-mushroom casing specifications give the numerical targets below, including a carbon-to-nitrogen ratio near 21:1; these describe conventional A. bisporus casing, not a universal recipe for every mushroom species.
| Property | Target | What it does |
|---|---|---|
| pH | 7.2–8.2 | Keeps mycelium and casing microbes near neutral to mildly alkaline conditions |
| Active lime | 2.5–3.5% | Helps hold that pH window as the crop runs |
| Water-holding capacity | 180–200% | Stores water without making capacity the only yield lever |
| Porosity | About 78% | Helps the layer stay open after repeated watering |
| Air-filled capacity | More than 12% | Allows gas exchange for pinning |
| Organic matter | About 47% | Provides structure without making the layer another compost bed |
| Total nitrogen | 1.22% | Describes overall nitrogen content; available nutrition should remain low |
| Soluble nutrients | Low | Too much available food favors vegetative growth over uniform fruiting |
Total nitrogen and available nutrients aren't interchangeable. A material can contain nitrogen bound into organic matter without supplying the readily available food that encourages an aggressively growing surface mat.
Likewise, a high water-holding figure doesn't mean the casing should sit saturated. Water can occupy the same spaces that would otherwise contain air, so the wettest mix isn't necessarily the most useful one.
Judge the mix after watering
A cultivation study in Ciência e Agrotecnologia found that total water-holding capacity alone didn't predict yield. Particle size, structure, and rewetting behavior therefore deserve attention alongside storage capacity.
Try a small sample before filling a tray. Hydrate it, let excess water drain, and check whether the particles remain distinct or collapse into a dense paste.
Then let the sample begin drying and wet it again. Water that runs around dry clumps rather than soaking through them signals uneven rewetting, even if the ingredient has an impressive capacity on paper.
Practical rule: Buy a casing for what it does after watering, not for how fluffy it looks in the bag.
Score a proposed mix against the table before buying or blending it. Ask for casing-specific information rather than assuming a potting mix, seed-starting medium, or mushroom substrate has the same job.
Casing Materials That Hold Up in Real Crops
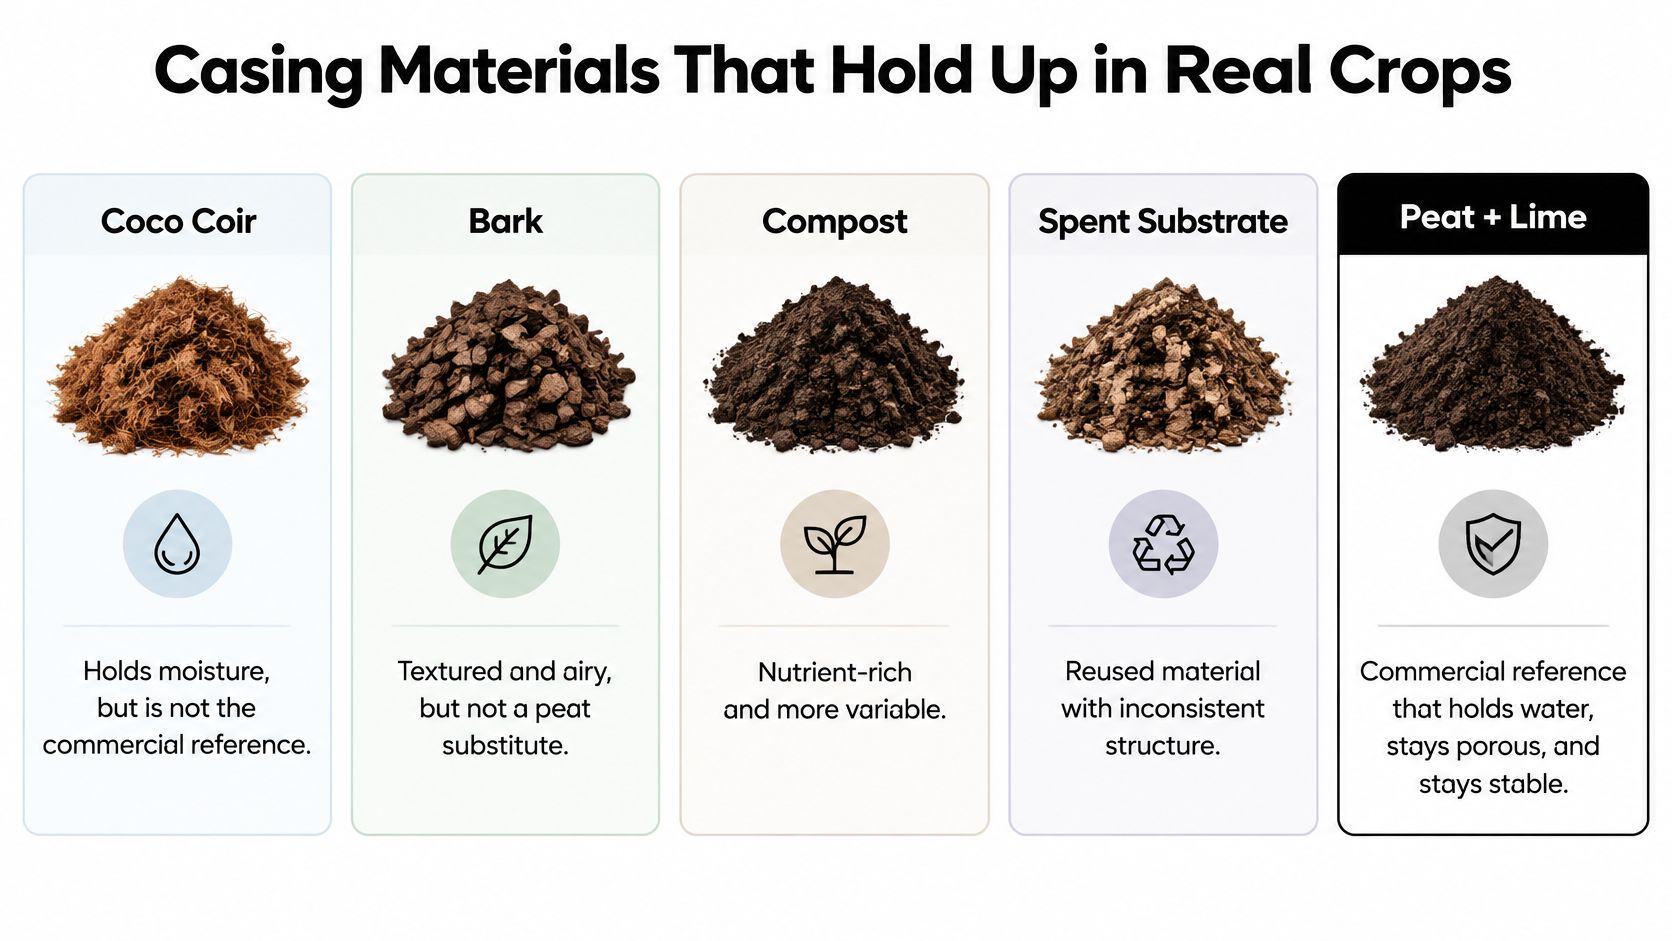
Coco coir, bark, compost, and spent substrate aren't interchangeable with peat. Peat with lime remains the commercial reference because a suitable formulation combines water retention, porosity, and low available food.
Start with performance, then consider the environmental rationale. Peat-free should describe a functioning casing, not just an ingredient claim.
Casing materials compared by consistency and risk
The AGRead record on alternative casing materials describes the contrasting 2025 Sitka spruce bark results and the spent-substrate yield and biological-efficiency figures included below.
| Material | Reported result | Main risk | Practical fit |
|---|---|---|---|
| Peat with lime | Commercial reference for yield and quality | Peat extraction impact | Default when consistency matters |
| Sitka spruce bark | One 2025 formula statistically similar to peat; two failed to produce a first flush | Water stress, inconsistent feedstock, contamination | Only a tested, even batch |
| Spent mushroom substrate | 295.67 g economic yield and 71.59% biological efficiency versus the best treatment's 326.2 g and 78.99% | Variable chemistry, porosity, and microbes | Partial blend, not an automatic swap |
| Partial peat replacement | Certain alternatives maintained yield without a significant reduction | Substitute quality and preparation | Tested blends rather than an assumed full replacement |
| Coco peat | Included in a casing-depth comparison; no standalone yield result established here | Uneven wetting or unsuitable particle structure | Casing-grade material assessed before use |
| Vermicompost or spent compost | Included in the casing-depth comparison | Higher available nutrients can favor vegetative growth | Restrained additions to a low-nutrient formulation |
| Casing with biochar | A small yield increase in a published trial | Treating an additive as a solution to poor structure | Optional amendment, not a casing replacement |
The material differences are easier to compare side by side.
Blends offer a more cautious route
A 2025 Journal of Environmental Management study found that certain alternative materials could replace up to 75% of peat in A. bisporus casing without significantly affecting yield. That supports testing partial replacement, not assuming any substitute will work at that proportion.
Bark illustrates the problem clearly. A textured material may look airy, yet inconsistent particle size and hydration can leave some areas dry while others remain excessively wet.
Spent substrate offers a reuse opportunity, but its previous crop and handling influence its condition. Check whether it still has resilient structure and whether its chemistry suits casing rather than feeding further vegetative growth.
A 2024 Turkish Journal of Agriculture and Forestry study reported 2,030.7 g per 10 kg of compost with 20 g/L biochar in the casing, compared with 2,009.5 g/10 kg for the control. That small numerical gain isn't a reason to expect an additive to rescue an unsuitable base mix.
Keep the distinction between casing and mushroom substrates clear when choosing ingredients. A material that's useful for feeding mycelium may be a poor surface interface.
Choose peat or a proven blend when consistency matters. Treat a novel peat-free mix as an experiment requiring clean feedstock, even hydration, and careful observation.
Depth pH and the Moment to Apply Casing
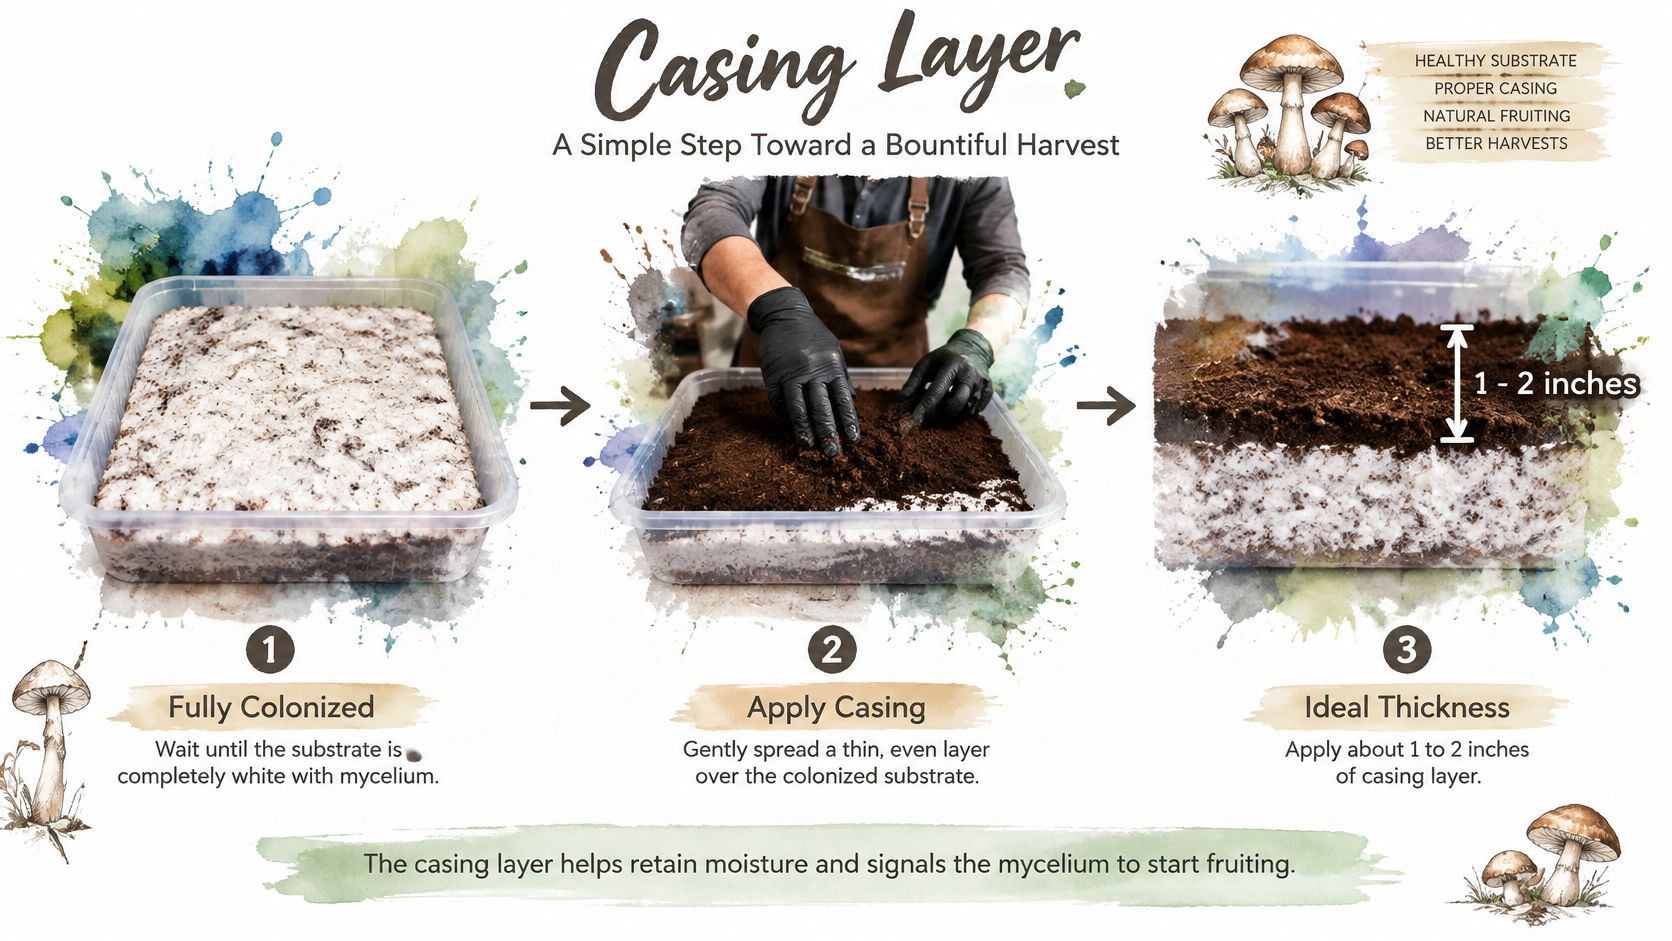
Apply casing after the compost or substrate is fully colonized. Don't use the cover to hide unfinished colonization, suspect patches, or a substrate that already smells wrong.
Prepare the casing separately so you can check its moisture and texture before it touches the crop. The application sequence should preserve the structure you've just assessed.
Set depth deliberately
A casing-material and thickness study compared commercial casing soil, spent compost, coco peat, and vermicompost at 2, 4, and 6 cm, and found 4 cm optimum for Agaricus bisporus under its tested conditions. That's a useful button-mushroom benchmark, not a depth prescription for unrelated species.
Deeper isn't automatically safer. Extra material changes the distance through which water and gases move, while an overly shallow cover may provide little reserve against drying.
Use a clean ruler to check the surface in several places. A level-looking tray can still have a thick center and thin edges if you spread the mix by eye.
Check chemistry before placement
A casing cultivation review describes casing pH reaching approximately 8.0 and says pH correction is generally necessary to provide near-neutral or mildly alkaline conditions. Use a calibrated pH meter and a consistent sample-preparation method rather than estimating acidity from the ingredient name.
Don't interpret a lime percentage as permission to add that amount of any lime product. Products differ in composition and reactivity; use a casing formulation matched to the actual amendment.
Follow this order:
- Hydrate evenly. Mix water through the material rather than wetting only the top. Break apart dry pockets with clean hands or a clean mixing tool.
- Check field moisture. A gently squeezed sample should hold together without releasing a stream of water. This is a practical texture check, not a substitute for material testing.
- Spread loosely. Cover fully colonized substrate evenly without tamping it down.
- Inspect the finish. Correct obvious hollows or ridges without polishing the surface into a sealed crust.
For a visual companion to the placement sequence, use the demonstration below.
A complete tray method also needs species-specific environmental management. Keep that separate from casing preparation so you can identify which part of the process needs adjustment.
How the Casing Supplies Water Between Flushes
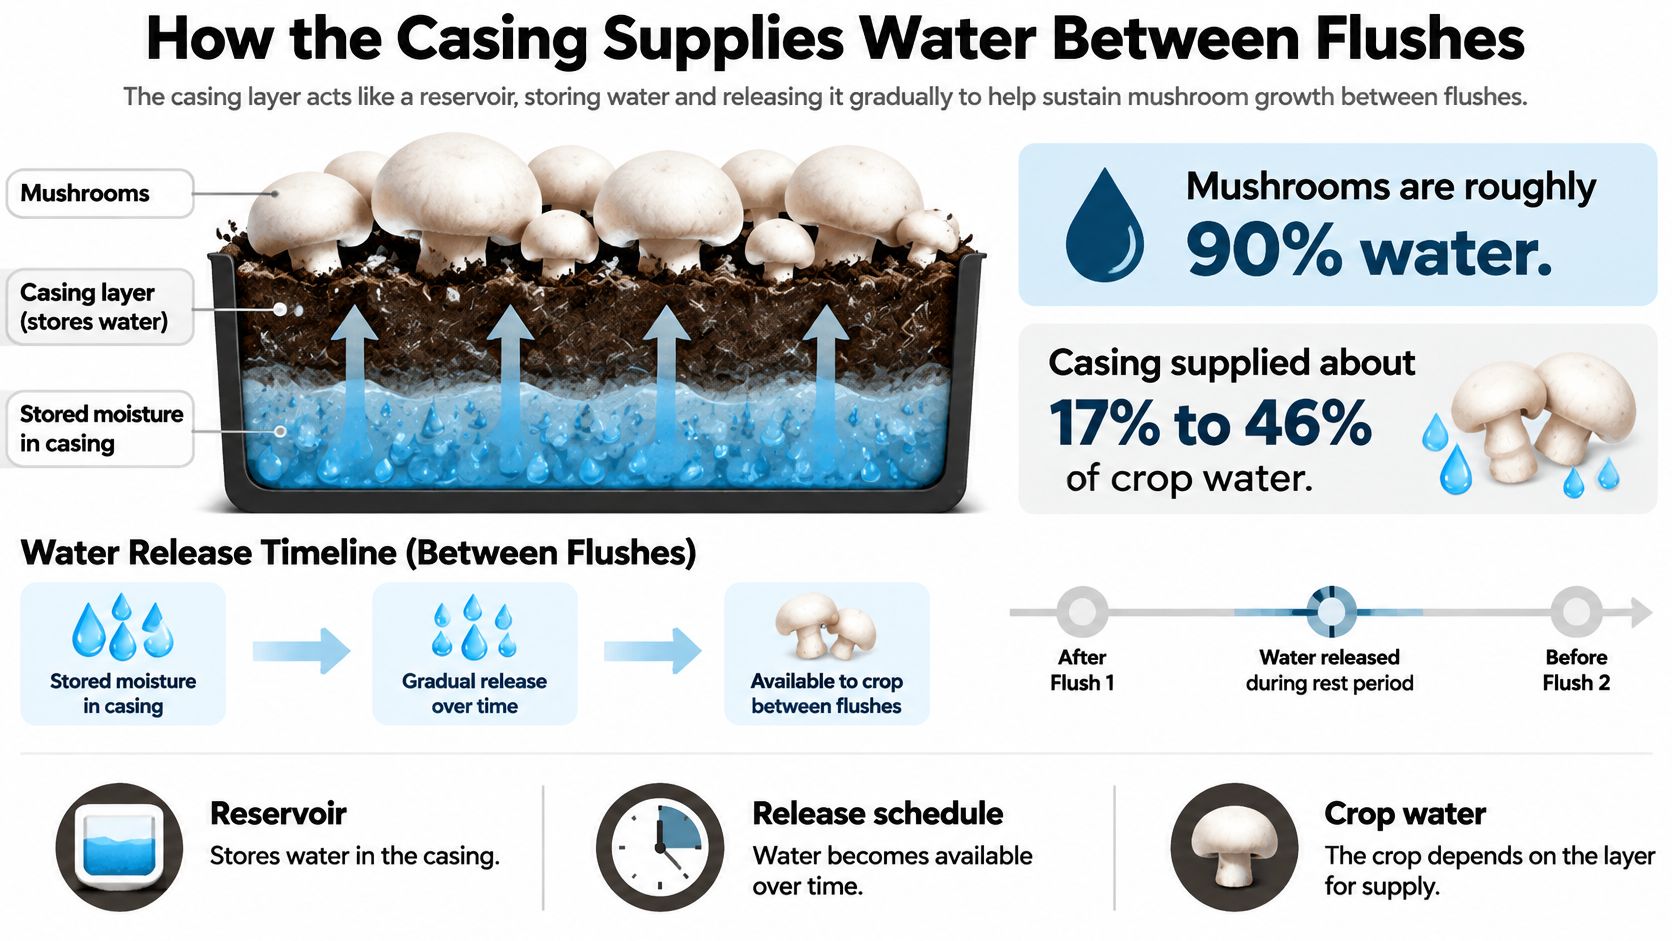
Treat the layer as a reservoir with a changing release pattern, not a sponge that needs misting whenever you pass the tray. Stored water helps only when the crop can access it without losing the air spaces around developing tissue.
The published casing-and-compost water measurements describe mushrooms as roughly 90% water, with casing supplying about 17–46% of crop water and compost supplying the remaining 54–83%. In those measurements, the contributions could become nearly equal by the third flush.
The reservoir view helps explain why surface appearance and deeper moisture must be considered together.
Small changes don't mean little movement
In the same measurements, casing moisture declined from 56.0% initially to 54.1% after the second flush, while compost moisture changed from 71.9% to 71.1%. Those bulk measurements don't mean that every part of the surface stayed equally supplied.
A tray can have moist material underneath a dry crust. Conversely, a shiny top can sit above a compacted layer that releases water poorly.
A study of water movement across flushes found that the first flush could be driven by a passive water-potential gradient between casing and mushrooms, while the second could develop without that same gradient. It also reported total yield increases of up to 1.4-fold when old casing was topped with fresh material or replaced after the second flush.
That finding challenges the assumption that the original cover must remain untouched throughout cropping. It doesn't make routine replacement sensible for every tray, especially where disturbance would damage developing pins.
Read the surface before reaching for water
Check the same parts of the tray repeatedly so you can distinguish a persistent dry edge from a temporary change after ventilation.
- Rapid drying: A surface that dries within hours may have inadequate reserve, poor rewetting, or excessive exposure to moving air.
- Persistent shine: A wet gloss that remains rather than draining suggests saturation, especially when the layer looks flattened.
- Slumping structure: Material that settles into a dense sheet may need structural correction rather than additional misting.
- Patchy absorption: Water that beads or runs into channels leaves some areas poorly supplied.
More water isn't a neutral adjustment. If the pores are already full, another spray reduces the room available for air.
Don't chase a uniformly wet appearance. Aim for a layer that accepts water evenly and retains its open texture, with no standing puddles.
The keep, top-up, or replace decision should follow these observations. A calendar alone can't tell you whether the casing still functions.
Bacteria That Help Pins Rather Than Spoil Them
Say a grower prepares a casing that looks physically sound, then sterilizes it to remove every microbe. Colonization continues, but the expected fruiting response doesn't follow.
In Agaricus bisporus, a casing-associated community isn't merely dirt to eliminate. The Microbiology Spectrum paper on casing microbiota describes communities dominated in part by Pseudomonadaceae and reports that fruit-body formation can fail in sterilized casing.
Earlier pins aren't necessarily a larger crop
Experiments with passaged casing produced earlier pinning, but total yield over a 24-day crop cycle wasn't significantly different. The useful distinction is between changing harvest timing and increasing cumulative production.
Passaged casing is an experimental treatment, not a recommendation to transfer used casing between home crops. Moving old material can also move organisms you don't want.
The species distinction matters too. In one Pleurotus ostreatus experiment, non-sterilized casing treatments produced 2,967 g versus 950 g for controls, alongside more fruiting positions.
That oyster-mushroom result doesn't make casing mandatory for oysters. It shows that a particular biological treatment can influence a crop under particular conditions.
Clean isn't the same as biologically empty
Use clean, biologically stable casing from a trustworthy source. Avoid indiscriminate sterilization where the cultivated species depends on beneficial casing interactions, but don't confuse that advice with permission to use dirty material.
Keep mixing containers and tools clean, separate fresh supplies from discarded crop material, and prevent stagnant, waterlogged conditions. A beneficial community doesn't compensate for poor sanitation.
- Source quality: Reject material with unexplained discoloration, putrid odors, or a history of careless storage.
- Handling: Don't return tools used on a suspect tray to a clean mixing container.
- Moisture management: Preserve drainage and air space rather than trying to suppress every problem with another treatment.
A living casing isn't a yield guarantee. Community makeup and crop stage matter more than the simple presence of bacteria.
An even pinset across an airy, non-sterile casing is compatible with useful microbial activity. Colored, slimy, or sour patches are warning signs, not proof that helpful Pseudomonads are at work.
You can't identify a bacterial species by eye. Treat suspicious changes as a crop-health problem rather than assigning them a beneficial name.
Casing Problems You Can Diagnose by Sight
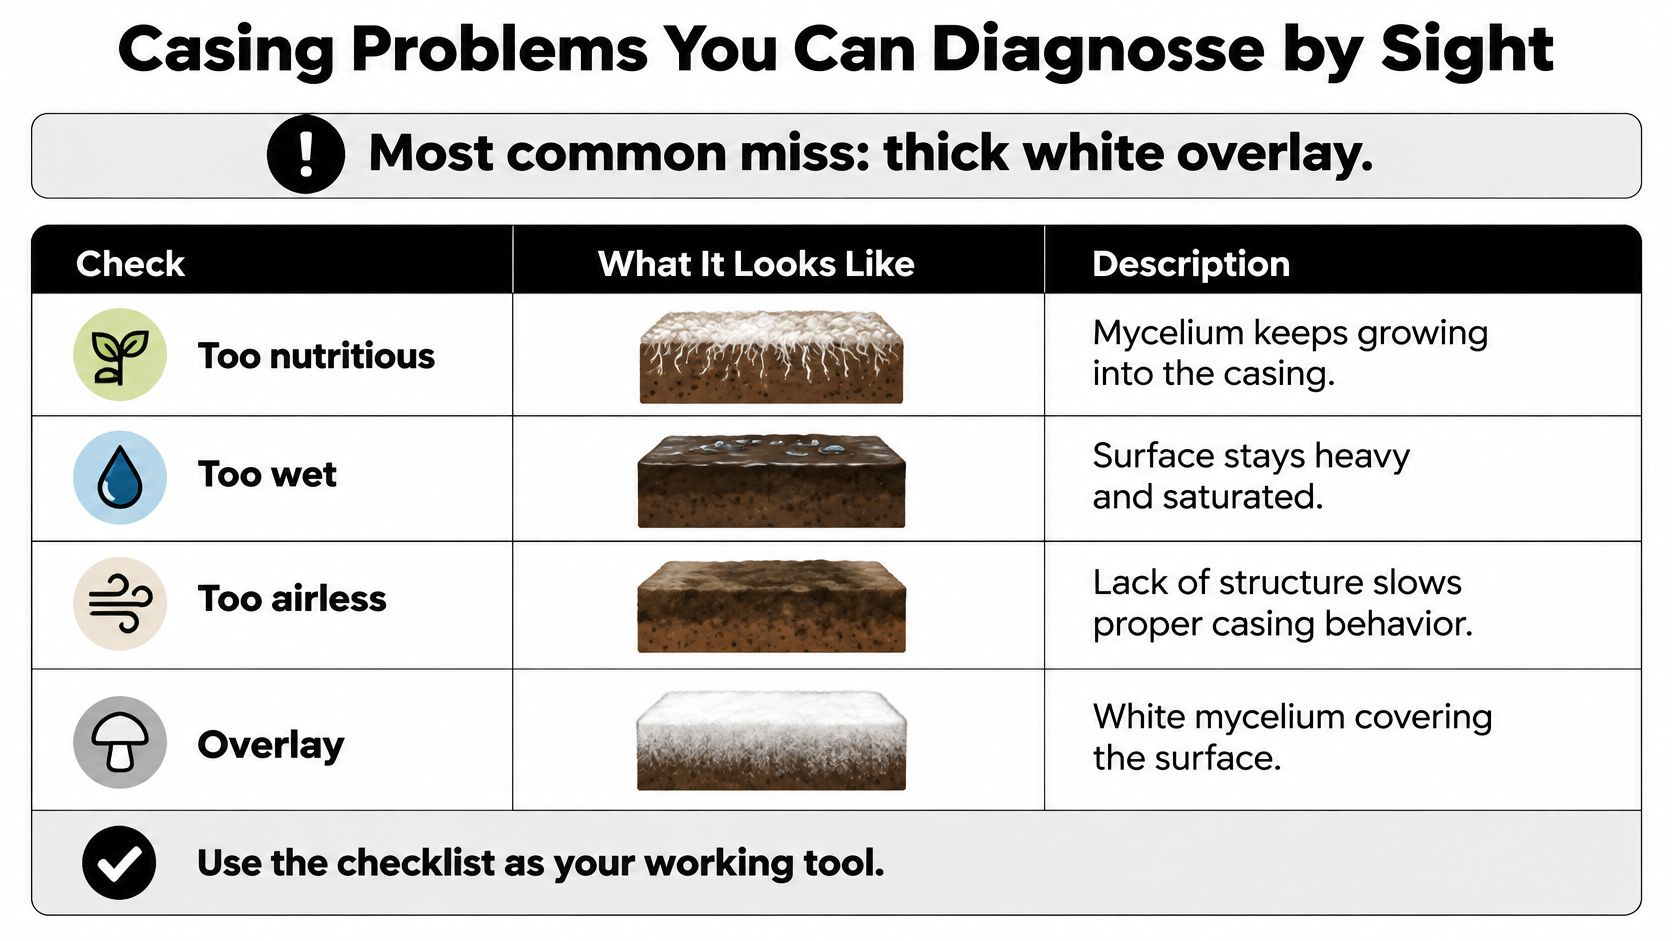
A thick white overlay is a common reason growers start changing everything at once. Yet white mycelium alone doesn't prove a problem; the concern is a dense, matted surface accompanied by poor pinning or stalled development.
Excess available food, persistent wetness, and poor aeration can all contribute. Don't automatically respond by spraying more water onto the mat.
Casing symptoms, causes, and fixes
Use these as working diagnoses, not laboratory identifications. Check the whole tray and its recent handling before deciding on a correction.
| What you see | Likely cause | What to change |
|---|---|---|
| Thick white overlay | Nutrients too high, or a wet, airless surface | Lower available food in the next mix; gently restore surface openness and air exchange |
| No pins after a sterilized casing | Missing beneficial casing bacteria in a species that needs them | Use clean, non-sterile casing appropriate to that species |
| Pins stall after the first flush | Water release and structure may have deteriorated | Assess whether topping up or replacing casing is preferable to soaking |
| Surface dries within hours | Insufficient depth or poor water retention | Rewet evenly and check depth against the species-appropriate benchmark |
| Sour, shiny, waterlogged surface | Saturation and poor drainage | Pause watering and correct drainage or pore structure |
| Green, black, or slimy patches | Suspected contamination, not evidence of helpful bacteria | Isolate the tray and address the contaminated material and its source |
| Late or patchy pins | Unsuitable pH or compaction | Measure pH and avoid packing the layer |
The visual checklist highlights the surface conditions worth investigating.
Separate repairable structure from contamination
A dry, otherwise healthy casing may accept gentle, even rewetting. A saturated casing needs the opposite response, so check below the surface before treating both trays alike.
Don't aggressively rake through established pins to loosen the cover. Work only where appropriate, using a clean tool, and avoid turning a minor structural problem into widespread tissue damage.
For suspicious discoloration, compare the overall pattern with mycelium contamination pictures, while remembering that photographs can't confirm an organism. Color, spreading behavior, texture, and odor together are more useful than color alone.
Removing a visible patch doesn't prove the rest of the tray is clean. Isolate suspect crops before handling them, avoid disturbing sporulating mold indoors, and discard extensively affected material rather than trying to case over it.
Make a readable correction
Keep a short tray note containing the symptom, the suspected cause, and what you changed. A photo taken from the same position makes spreading patches or improving pin distribution easier to compare.
For overlay, distinguish a rich formulation from a sound mix that you've kept too wet. For delayed pins, check whether the problem follows compacted areas rather than assuming the entire casing needs replacement.
Change one variable at a time whenever crop health permits. The next flush should help you judge a correction, not leave you guessing which of several simultaneous changes mattered.
Choose a Casing Plan Before the Next Flush
Keep a casing that rewets evenly and stays airy. Choose a proven blend when reducing peat use, and skip casing when the species fruits reliably from bare, correctly hydrated substrate.
For button mushrooms and other species known to benefit from a low-nutrient interface, conventional peat-lime casing is a practical starting point. Evaluate the actual formulation against its intended job rather than relying on the ingredient name.
Match the plan to the tray
- Keep it: The layer remains open, accepts water, and supports reasonably even development.
- Refresh it: A healthy crop has a crusted or structurally exhausted cover that no longer rewets properly. Weigh the benefit against damage to existing pins.
- Blend cautiously: The alternative material has already been checked for moisture behavior, pH, and cleanliness.
- Skip it: The established species-specific method doesn't require a casing, and adding one would trap unnecessary water.
A growing-your-own-mushrooms guide can help you consider the broader commitment before starting another crop. Readers who prefer not to cultivate can choose finished mushrooms from The Magic Mushroom Delivery instead; that's a shopping path, not a substitute for diagnosing a tray.
We partner with growers to source our mushrooms and test them to ensure they're free from DMT and other contaminants. We use only organic mushrooms in our products, cultivated with organic farming practices free from synthetic pesticides, herbicides, and fertilizers.
Write down the material, depth, and measured pH before applying your next cover. That small record turns the following flush into a useful comparison rather than another guess.
The Magic Mushroom Delivery offers finished mushrooms and mushroom products for readers who would rather shop than manage casing, hydration, and harvests. Visit The Magic Mushroom Delivery to browse the range and choose the non-growing path if maintaining a crop isn't for you.