You've probably hit the same point many growers do. Cubensis went well, your jars or bags colonized without drama, your tub fruited, and now you want something that feels less like repeating a recipe and more like learning a craft.
That's where Copelandia cyanescens cultivation gets interesting.
Copelandia, now more commonly referred to as Panaeolus cyanescens, rewards precision and punishes lazy assumptions. It isn't hard in the sense that it asks for exotic equipment. It's hard because every small mistake matters more. Moisture matters more. Air exchange matters more. Substrate choice matters more. If you try to grow it with cubensis habits, you usually get thin growth, stalled trays, weak pinsets, or contamination that takes over before the mycelium really gets moving.
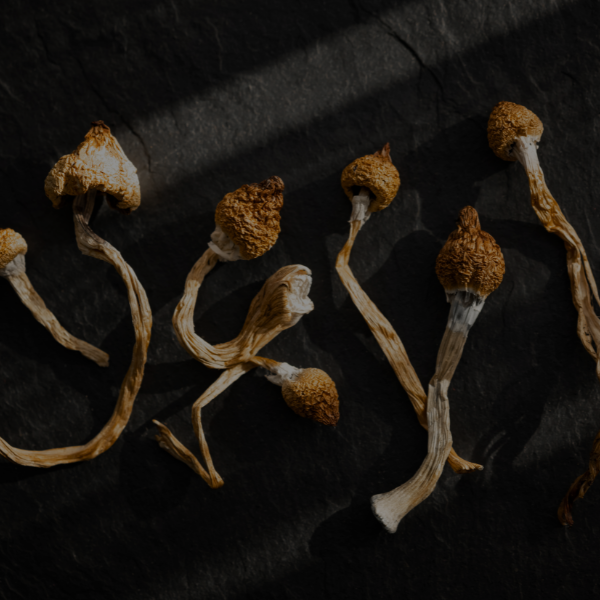
The payoff is obvious. Copelandia cyanescens is one of the most potent psilocybin mushrooms documented, with a 2010 study reporting about 2.5% psilocybin and 1.194% psilocin as summarized on Wikipedia's Panaeolus cyanescens page. That potency is one reason careful cultivation and cautious handling matter so much.
An Introduction to the Copelandia Challenge
A lot of growers arrive here after a successful run with easier species and assume the next step is just finer tuning. That's only partly true. Copelandia responds to good technique, but it also forces you to understand why a technique works.
This species has a reputation for being more finicky and delicate, and that reputation is earned. Practical guides consistently describe a narrow environmental band, warm conditions for colonization, very high humidity for fruiting, and strong attention to moisture management on dung-based substrate systems. In other words, this mushroom doesn't just want food and water. It wants a believable version of its natural habitat.
That's why broad “just keep it humid” advice fails so often. If the surface is wet, pins can stall. If the chamber is moist but stale, fruits stay weak or abort. If the substrate is rich but dense, colonization can slow enough for competitors to move in. The grower's real job isn't merely maintaining parameters. It's balancing them.
For people who want a wider look at where this species sits among other varieties, this overview of types of psychedelic mushrooms gives useful context without flattening the differences between species.
Why experienced cubensis growers still struggle
Cubensis lets you get away with a lot. It tolerates broader swings. It forgives a slightly wet substrate. It often fruits under conditions that aren't ideal.
Copelandia usually won't.
Practical rule: If your process depends on forgiveness, it's a cubensis process, not a Copelandia process.
That's also why this species is so satisfying. Once you stop looking for a universal recipe and start reading the organism, the whole project changes. You begin to see the substrate as a water reservoir, the casing as a control layer, and fresh air as a fruiting trigger rather than a background detail.
What good cultivation looks like
Strong Copelandia grows tend to share a few traits:
- Clean spawn expansion: Colonization moves quickly when the substrate is prepared well and not overloaded with water.
- Even surface conditions: The casing holds moisture without becoming swampy.
- Active fruiting management: The grower adjusts humidity and air, instead of sealing the setup and hoping for the best.
- Fast response to problems: Aborts, mats, and stalled trays are treated as environmental feedback.
That mindset matters more than any single recipe. If you can diagnose what the tray is telling you, you're already ahead of most failed attempts.
Understanding the Copelandia Blueprint
A tray can look healthy for days, then miss the turn into fruiting because one variable drifted. That pattern frustrates growers who are used to cubensis, but it also explains Copelandia. This species behaves like a tropical pasture mushroom under glass. It responds to warmth, surface moisture, oxygen, and evaporation as a connected system, not as separate checklist items.

Its biology explains its difficulty
Copelandia fruits from a narrower environmental window than many growers expect. Warmth helps, but warm and wet alone often produces a lazy, matted surface. High humidity helps, but only if the surface still gets enough air exchange to evaporate lightly and reset itself. That is why trays can colonize well and still fail at pinning.
The species also exposes substrate mistakes early. Rich mixes can produce strong growth, but they hold more risk if they compact, stay muddy, or release too much moisture into the casing. Lighter mixes colonize faster and cleaner in many setups, though they may give you a smaller margin for water later. If you want a broader background on how different magic mushroom substrates behave, the main point here is simple. Copelandia punishes imbalance faster than species that tolerate a denser or wetter bulk.
What each layer is actually doing
Good Copelandia grows make more sense once you separate the job of each layer.
- Spawn supplies speed and even distribution. Weak spawn often looks acceptable at first, then loses the race once manure-based bulk adds microbial pressure.
- Bulk substrate provides food and stored water, but its structure matters as much as its nutrition. Air space inside the mix supports faster recovery and steadier colonization.
- Casing controls the fruiting surface. It buffers moisture, slows direct water loss, and gives pins a better interface than exposed colonized substrate.
- Fruiting air clears carbon dioxide and drives the mild surface evaporation that helps initiate pins and shape normal fruits.
Miss one of those jobs and the whole tray starts speaking in symptoms. Overly wet bulk pushes moisture upward and leaves the casing greasy. Weak air exchange leaves the surface swollen and cottony. A dry casing can stall pin formation even when everything underneath is fully colonized.
Why cubensis logic breaks down
Cubensis habits often fail here because they treat fruiting as a waiting game. Copelandia is more responsive and less forgiving.
A bright white tray does not guarantee readiness. In practice, I trust surface texture more than color alone. If the casing looks heavy, shiny, or pasted down, the tray is usually carrying too much water or too little air. If it dries to a pale crust, humidity or misting rhythm is off in the other direction. The target is a surface that stays lightly moist, open, and alive-looking.
That is the blueprint. Substrate governs water release and contamination exposure. Casing regulates the pinning surface. Fresh air acts as a primary fruiting signal, not a final adjustment after everything else is set. Once you understand why each part matters, troubleshooting gets much easier because the tray stops looking mysterious and starts giving clear feedback.
Substrate Preparation and Inoculation
A Copelandia tray often succeeds or fails before incubation even starts. The mistake is rarely “using the wrong recipe” in some absolute sense. It is choosing a substrate that asks for more precision than the grower can consistently give.
Manure and straw can produce excellent trays. They also punish sloppy moisture control, weak spawn, and poor texture. Lighter mixes usually give up some raw nutrition, but they recover faster from small errors and stay easier to read. That trade-off matters more with Copelandia than with forgiving species.
One of the better practical discussions on the topic makes that point clearly. Dense substrates slow colonization, hold trouble spots, and raise contamination pressure, while materials such as coir, leaf mold, compost, and chopped straw can all work if the structure stays loose, as discussed in this guide to the best substrate for growing Panaeolus cyanescens.
What the substrate needs to do
Copelandia substrate has four jobs:
- Provide nutrition without turning into a bacterial incubator
- Hold water without becoming muddy or compacted
- Keep enough air space for quick, even colonization
- Release moisture gradually so the casing stays moist instead of waterlogged
That last point gets missed. A tray can be fully nutritious and still fruit poorly if it pushes too much water upward. The casing then stays greasy, mycelium spreads unevenly, and pins hesitate. Good substrate prep is not just about feeding the fungus. It is about controlling how water moves through the tray later.
Copelandia substrate comparison
| Substrate Mix | Yield Potential | Contamination Risk | Best For |
|---|---|---|---|
| Horse or cow manure with chopped straw | High when moisture and cleanliness are well managed | Moderate to high if prepared poorly or kept too wet | Growers comfortable with manure prep and active fruiting control |
| Manure-enriched compost | Good potential, especially when texture stays airy | Moderate, depends heavily on source material and structure | Intermediate growers who can judge field capacity well |
| Coir with supportive amendments | More forgiving than heavy manure systems | Lower to moderate, especially when not overwatered | Growers prioritizing easier handling and cleaner prep |
| Leaf mold or compost-based alternative mixes | Can fruit well when the texture stays loose | Variable, depends on source consistency | Experimenters who already know how to read a tray |
| Straw-forward lighter mixes | Good airflow and fast surface recovery | Moderate if hydration is uneven | Growers trying to avoid dense, muddy substrate |
For readers comparing broader material options, this guide to magic mushroom substrates gives a useful overview of how different base materials handle moisture and structure.
Moisture is the first gate
If I had to pick one failure point, it would be overhydration.
“Field capacity” only helps if you know what you are feeling for. The substrate should feel springy and evenly hydrated, with no dripping and no hidden wet pockets. A hard squeeze might produce a few reluctant drops at most. If water runs, the mix is too wet for this species. Copelandia usually forgives slight restraint better than excess.
A slightly dry tray may colonize a bit slower. An over-wet tray often turns sour, compresses under its own weight, and hands the advantage to bacteria.
Build for structure, not just ingredients
Ingredients matter less than the way they sit together after mixing. Chopped straw adds air channels. Manure adds nutrition and water-holding capacity. Coir can stabilize texture and make a mix easier to handle. Compost can work well, but only if it is clean and not fine enough to pack down.
That is why two growers can use nearly the same recipe and get very different results. One ends up with a loose, breathable substrate. The other makes a dense slab that colonizes unevenly and floods the casing later. Copelandia responds to structure first.
A practical inoculation workflow
Keep inoculation clean and simple.
- Hydrate and mix until the substrate is uniform. Break up clumps and remove any heavy wet masses before spawn ever touches the bulk.
- Use aggressive, clean spawn. This species moves fast on good spawn and struggles quickly on weak or suspect grain.
- Distribute spawn evenly through the tray. Slow corners become contamination magnets and often show up as uneven surface growth later.
- Level the substrate lightly. A flat surface helps casing performance, but pressing down the tray reduces the air space you just worked to preserve.
- Leave enough headroom for casing and surface management. Shallow trays can work well, but they still need room for moisture control at the top.
I prefer to judge the finished tray by hand before closing it up. If it feels heavy, slick, or packed, I fix it then. Problems caught at mixing are cheap. Problems discovered after casing usually cost the whole run.
The casing is part of the substrate strategy
Casing is not an afterthought with Copelandia. It is part of the substrate decision from the start because the bulk layer determines how easy the casing will be to manage.
A well-built tray gives the casing gentle, steady moisture from below. A badly built tray either drowns it or starves it. That is the reason substrate choice and inoculation technique matter so much here. They set the conditions that make precision fruiting possible later, or make it frustrating no matter how carefully you mist, fan, or adjust humidity.
Incubation and Colonization Protocols
You close up a tray that looked fine at mixing, come back two days later, and one side is racing while the other sits dull and wet. Copelandia usually gives that kind of warning early. Colonization is less about waiting for white growth and more about reading whether the substrate is exchanging air, holding water, and supporting even recovery from spawn.
Temperature matters here, but precision matters more than chasing the hottest number that still sounds acceptable. Warm, steady conditions help this species colonize quickly. Repeated swings slow the weaker sections first, and those weak sections are where bacterial slickness or mold usually gets a foothold.

What healthy colonization looks like
Healthy Copelandia colonization has a certain rhythm. The tray should recover from spawning evenly, with white growth appearing across the surface instead of exploding from one dense patch and stalling elsewhere. Fast growth is common with this species, but clean growth has structure. It looks organized, fine, and progressive.
After casing, fresh mycelial activity often shows up quickly under good conditions, as noted in this Copelandia cyanescens cultivation document. That speed tempts growers to rush the next move. I would rather see a tray that is uniformly ready than one dramatic section trying to convince me the whole substrate is on schedule.
Watch for these signs:
- Even recovery across the tray
- Bright, consistent white growth instead of isolated islands
- A surface that stays springy rather than greasy, glossy, or compressed
- Clean mushroom smell, with no sour or swampy notes
- Edges that keep pace with the center
The edges matter. A tray can look strong in the middle and still be heading for trouble if the perimeter stays behind.
Why colonization fails so often
Three problems cause most bad trays at this stage. Too much water fills the air spaces the mycelium needs. A dense substrate blocks gas exchange even if moisture is technically correct. Dirty or tired spawn gives contaminants time to compete before Copelandia can take control.
Those failures look different on the surface, but the cause is often the same. The mycelium is being asked to colonize a medium that is either too wet to breathe or too compact to move through.
That is the trade-off growers miss. Richer, heavier substrates can look promising on paper, yet they narrow the margin for error during incubation. Lighter, airier trays usually colonize more predictably, but they demand better moisture discipline later. Copelandia punishes the wrong compromise fast.
If one corner lags hard, treat it as a diagnosis problem, not a patience problem.
How to run the phase cleanly
Keep the environment boring and consistent. Steady warmth, limited handling, and close observation beat constant adjustment.
- Keep temperature stable: Warm is helpful. Fluctuation is stressful.
- Leave the tray alone unless you have a reason to intervene: Every check introduces new air, new spores, and one more chance to make a good tray dirty.
- Read the slow areas first: Corners and edges show moisture and density problems before the center does.
- Do not case early out of impatience: Wait for full, even colonization of the substrate so the casing layer starts on a level surface.
Good incubation looks quiet. That is usually a sign that the substrate recipe, moisture level, and tray structure are all working together instead of fighting each other.
Mastering Fruiting Conditions
Fruiting Copelandia is where recipe growers usually get exposed. The common mistake is treating the chamber like a sealed humidity box and waiting for nature to do the rest. That method can work with easier species. It often fails here.
The reason is simple. Existing guides give broad targets like 75–85°F and 90–100% humidity, but the primary challenge is maintaining both very high humidity and strong fresh-air exchange at the same time, as noted in this overview of Panaeolus cyanescens fruiting conditions. Those goals pull against each other. More air tends to dry the surface. More humidity tends to reduce air movement if you manage it passively. Copelandia needs both.

Why set and forget usually fails
A stale chamber can still read humid. That's one of the biggest beginner traps with this species.
Pins don't just need moisture. They need an active surface climate. If the casing stays wet and the air stays heavy, the mycelium often keeps sitting there instead of committing to a clean pinset. If you overcorrect with too much direct misting or too much ventilation, the surface dries and the pins that do form can abort.
That's why fruiting Copelandia feels less like setting a number and more like steering a narrow lane.
The three variables that matter most
Humidity
High humidity matters, but not in the blunt “keep everything wet” sense. The target environment is moist air and a hydrated casing, not visible water sitting on the fruiting surface.
Watch for these cues:
- Good sign: The casing looks evenly moist and alive.
- Bad sign: Droplets pool on the surface or collect heavily with poor evaporation.
- Another bad sign: The casing crusts over and lightens too quickly between checks.
Fresh-air exchange
Fresh air is one of the main triggers for normal Copelandia fruiting. Without enough of it, the surface tends to stay dull and unresponsive, or you get weak, unsatisfying fruits.
The challenge is delivering air exchange without collapsing humidity. In practice, that means small, frequent corrections work better than dramatic ones. Wide-open drying cycles usually hurt more than they help.
Casing behavior
Some species can fruit decently with casual casing habits. Copelandia generally benefits from treating casing as a real control layer. It should hold moisture, breathe, and stay responsive. If it becomes muddy, the tray struggles. If it dries and compacts, pinning gets uneven.
The casing should behave like a buffer, not a blanket. It moderates the surface. It shouldn't smother it.
What active management looks like
A reliable fruiting routine usually includes:
- Checking the surface daily: Not to fuss with it constantly, but to catch drift before it becomes a problem.
- Correcting lightly: Fine adjustments beat hard resets.
- Protecting against condensation overload: Moist air is good. runoff is not.
- Maintaining warmth while preserving oxygen flow: The species likes tropical conditions, but not stagnant ones.
Interpreting common fruiting signals
If the mycelium looks healthy but refuses to pin, the issue is often at the surface. The casing may be too wet, too dry, too compact, or sitting in air that's humid but stale.
If pins appear and then stop progressing, look at the balance between humidity and exchange. Aborts often mean the tray was allowed to swing too far in one direction.
If contamination appears during fruiting, don't only blame sterility. Fruiting conditions can create contamination opportunities by keeping surfaces over-wet or by slowing the mushroom's momentum.
A note on light
Light isn't the main difficulty with this species, but a steady cue helps keep development orderly. Indirect ambient light is commonly used in practical grows, and consistency matters more than intensity in most home setups. The bigger fruiting battle is still the humidity and air exchange relationship.
Harvesting Troubleshooting and Next Steps
Harvest day is where all the earlier discipline pays off. Copelandia fruits are delicate, so rough handling can tear up the surface and reduce your chance of a clean follow-up flush.

Harvest gently, especially when fruits are clustered. Twisting too hard can pull casing and substrate loose. Many growers prefer careful cutting or a very light twist-and-lift approach, depending on how firmly the fruits are attached. The less damage you do to the surface, the easier recovery tends to be.
For kit-style grows, one practical routine advises growers to refresh oxygen by squeezing the bag once or twice a day, with pins appearing in 6–11 days and harvest following 5–7 days after pinning, according to these advanced Copelandia grow instructions.
Troubleshooting the usual failures
The patterns repeat often enough that you can diagnose most trays quickly.
- Pins form and then abort: The fruiting surface usually drifted out of balance. Check whether the casing stayed too wet, too dry, or too stale.
- The tray stalls after casing: Look at surface condition before anything else. A compacted or over-saturated casing often shuts the process down.
- Colonized substrate won't fruit evenly: Uneven air movement or inconsistent surface moisture is often the culprit.
- Contamination appears late: Review both your cleanliness and your environmental management. A stressed tray is easier to invade.
If you need visual help identifying what contamination looks like in real grows, these mycelium contamination pictures can help you compare suspicious patches against known patterns.
Here's a useful visual reference before you start refining your next run:
How to improve the second attempt
Most growers don't fail Copelandia because they lack dedication. They fail because they treat every issue as a mystery instead of a response.
On your next run, change one thing at a time. Simplify the substrate if your first tray was too rich or dense. Tighten moisture control if the casing got swampy. Increase oxygen rhythm if the chamber felt heavy. Copelandia rewards growers who keep notes and learn from one variable, not ten at once.
A successful run doesn't come from copying a recipe perfectly. It comes from understanding what the mushroom is asking for, then building an environment that answers clearly.
If you want cultivation guidance, product context, and practical mushroom education in one place, The Magic Mushroom Delivery also publishes resources for growers and mushroom users who want clearer, more experience-based information.